Why is proper file preparation crucial?
Professional preparation of text for printing is the foundation of your publication’s physical quality. Many people, working daily in front of monitors, forget the fundamental difference between screen and paper. A screen emits light, while paper reflects it. This physical difference requires completely different colour systems.
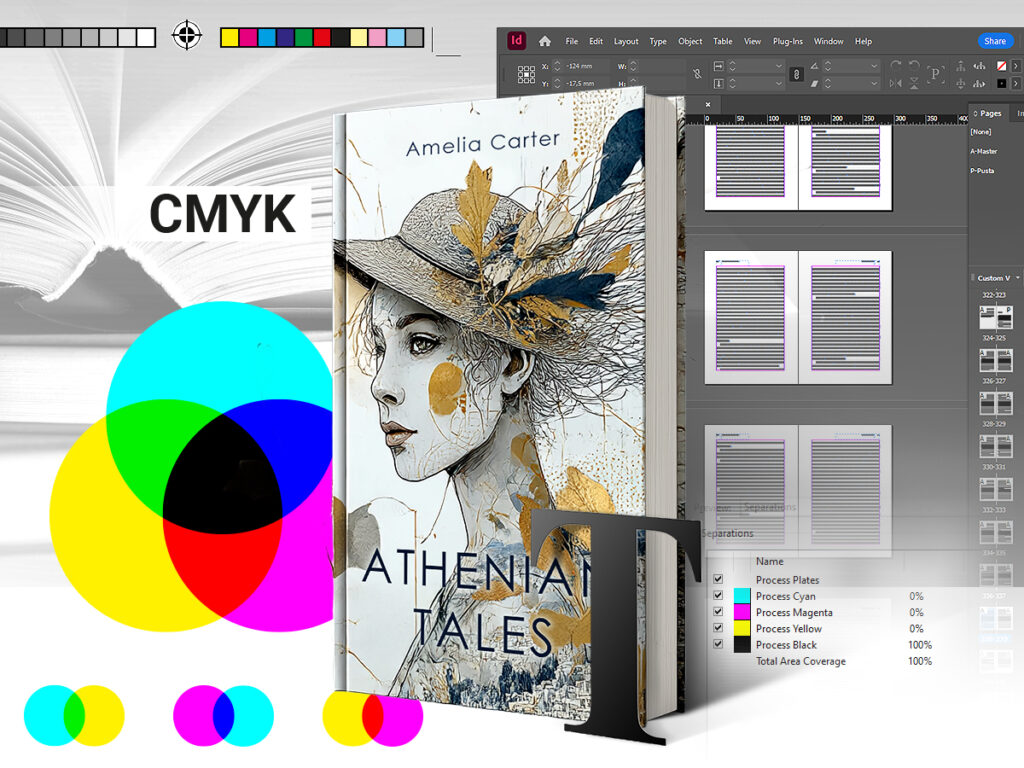
The image on your computer, tablet, or smartphone is displayed in RGB (Red, Green, Blue). These are light colours, ideal for digital media. However, printing presses work in a completely different system – CMYK (Cyan, Magenta, Yellow, Key/Black). If you send RGB files to the printing house, the machine will automatically convert them. The result? Colours may drastically lose saturation, and bright hues can become dull and faded. Therefore, to avoid disappointment, you must work in the CMYK colour space from the very beginning.
Basic parameters you must ensure:
- Colour Profile: for colour printing, use Coated FOGRA 39, and for black and white Gray Gamma 1.8 or 2.2. Where to find these profiles? In professional software (like Adobe Photoshop, Illustrator, or InDesign), they are usually installed by default – look in “Edit” ->>”Color Settings”>. If you use other software, these profiles are a general printing standard – you can easily download and install them.
- Resolution (DPI): this is the number of dots of ink per inch. Monitors don’t need high DPI, but printing requires a minimum density of 300 DPI. Graphics with lower resolution will turn out blurry and pixelated.
- File Format: the standard ensuring safety is PDF (preferably PDF/X-1a). We accept TIFF files (flattened to one layer) as a last resort, but PDF automatically safeguards most print settings, such as font embedding.
Formatting the book interior and typography
Correct book formatting requires precision in page settings. Imagine that every sheet passes through many machines during production. Minimal vibrations are inevitable, so safety margins are essential.
Here are the golden rules for preparing the book block (interior):
- Single Pages: the PDF file must contain consecutive, single pages, not spreads (two pages visible side-by-side). The exception is specific layflat board book bindings.
- Bleed: the absolute basic. Bleed is the graphics area (background, photos) extending beyond the net format of the book – usually by 3 mm. Why? When the guillotine cuts the sheet, the knife may shift a fraction of a millimetre. Thanks to bleeds, the reader sees an aesthetically cut photo instead of a white strip.
- Safety Margins: move all important elements (text, page numbers, logos) at least 5 mm away from the cut edge. From the spine side, we recommend an inner margin of min. 10 mm so text doesn’t “fall” into the book’s crease.
For typography detail lovers – watch out for black!
Prepare small black texts and barcodes as 100% K (only black ink), without mixing other colours. If you use so-called rich black (composed of all four CMYK colours) for small text, a minimal shift will cause the letters to blur. Use Rich Black (e.g., C:30 M:30 Y:30 K:100) only for large solid areas (backgrounds). Also, remember that white text on a black background must not have the overprint option enabled – otherwise, it will disappear in print.
Your book cover design
The cover is your work’s showcase. Your book can have a softcover, hardcover, saddle stitch, or Wire-O binding – each has different technical requirements.
Key guidelines for covers:
1. Softcover:
- Required bleed: 3 mm.
- Safety margin for text: 5 mm from the edge and 8 mm from the spine.
- Spine: place text on it only if it is wider than 5 mm.
2. Hardcover:
- Wrap area: 15 mm. This is the paper area intended for wrapping and gluing to the cardboard binder. You must continue the graphics within this area.
- Hinge area (Joint): must be 12 mm. This is where the cover works when opening the book.
- Safety margin. Occurs between the safe print area and the wrap area. Do not place essential design elements like text or logos here.
3. Wire-O Binding (Spiral):
- Required bleed: 3 mm.
- Margin from the spiral side: minimum 13 mm for softcover and 16 mm for hardcover.
- No text or logos can be in this area – it is the punching zone for the wire.
4. Saddle Stitch (Booklet):
- Required bleed: 3 mm.
- Safety margin: essential elements min. 5 mm from the cut edge.
- Page count must be divisible by 4. Also, remember the maximum volume for this binding is 96 pages – above this, the centre pushes out unpleasantly (“creep”).
Professional printed book – edge printing and finishes
If your book is to catch the eye on the shelf, consider special add-ons. While preparing masks for UV varnish or foiling requires reading our detailed instructions, the hit of recent years – printed edges – deserves a separate mention.
This striking finish allows graphics to be applied to the page edges. To prepare this correctly:
- Prepare 3 separate PDF files (for the top, bottom, and front edge).
- Graphics must be prepared in vertical orientation.
- A 3 mm bleed is required on each side of the design.
- Important: the design width for hardcover is the thickness of the block itself plus endpapers – do not include the cover spine thickness here.
Most common mistakes and correct preparation
Even experienced publishers make mistakes. Here is a list of traps to avoid:
- Format mismatch: if you order an A5 book but send an A4 file (or vice versa), we will flag an error. Always ensure PDF dimensions match the order.
- No bleed: if the background ends right at the page edge, white strips may appear after cutting.
- Fonts not embedded: if you don’t embed fonts in the PDF or convert them to curves, the machine might substitute them.
- Page count mismatch: in hardcover and saddle stitch, the page count must be divisible by 4. If you forget, blank technical pages will be added.
Checklist for publisher, graphic designer, and author – step by step
To ensure a stress-free process, we’ve prepared a simple instruction. Treat it as your roadmap.
1. Cover Preparation:
- Use the free template generator on our website – enter the page count and paper type, and the system will calculate the spine. Download the file.
- Open your design software (e.g., Illustrator, InDesign, Photoshop) and open the downloaded template as a helper layer.
- Design the cover, extending the background to the template’s outer edges.
- Check if important text fits within the safe area (min. 5-12 mm from the edge).
- Save as PDF in CMYK (profile Coated FOGRA 39).
- Name the file clearly, e.g., cover_JohnDoe_title.pdf.
2. Book Block (Interior):
- Set the page format to the ordered book size + add 3 mm bleed on each side.
- Typeset the text, remembering inner margins (min. 10 mm from the spine).
- Save (export) the entire project to a single PDF file containing consecutive single pages (not spreads).
- In PDF settings, ensure fonts are embedded or curved.
- Save the file clearly, e.g., interior_JohnDoe_title.pdf.
3. Finishes (Optional):
- Remember that finishes (e.g., UV varnish) are applied based on a separate file called a mask.
- Prepare the mask in 100% K (black) on a white background. Black indicates where the varnish/foil will appear.
- The mask format must match the cover’s gross format.
- Do not use gradients or shadows – the mask must be “0 or 1”.
- Detailed requirements vary by technology – check the dedicated instruction on our site before sending.
- Save the file clearly, e.g., UVmask_JohnDoe_title.pdf.
Remember, at Books Factory, we provide free template generators not just for covers, but also for endpapers or dust jackets. Using them eliminates 90% of technical errors.
Have a problem? We are happy to answer your questions. Contact our sales department – we will help you button up your project perfectly.